Electrical Circuit Troubleshooting: Tips and Tools
Steve Maurer, IME
Troubleshooting isn't just a skill—it's a necessity. With technology advancing at lightning speed, staying abreast of the latest tools and techniques is vital. This article on electrical circuit troubleshooting is for you—the professional electrician—whether you're a private contractor or an industrial specialist.
First, we'll look at some basic and more advance troubleshooting techniques and strategies.
Then we'll discuss the importance of safety protocols when working with live circuits—an area that demands our undivided attention.
From there, we'll delve into the essential diagnostic tools that are key to effective troubleshooting. These are the very foundations of our craft, and understanding them can make all the difference in our day-to-day work.
A Look at Basic and Advanced Techniques
The first step is to verify the power supply to the circuit. This initial check, while simple, is crucial as it can rule out power issues and save considerable time in the troubleshooting process.
Once you confirm the proper power is present, proceed with a thorough visual inspection of the circuit. Be on the lookout for any noticeable signs of wear or damage, such as frayed wires, corroded connections, or burned-out components. These visible signs often point directly to the problem area.
An important aspect of troubleshooting that's often overlooked is documenting your steps and findings. Keeping a record of the symptoms observed, the steps taken to troubleshoot, and the results can be invaluable. This documentation can serve as a reference guide for future troubleshooting tasks on the same or similar circuits, saving time and ensuring consistency in your approach.
Moving onto advanced techniques, using diagnostic tools like a multimeter becomes vital. A multimeter allows you to measure key parameters like voltage, current, and resistance within the circuit, offering insights into its functioning and helping identify any irregularities that may exist.
Another advanced technique involves the use of thermal imaging to identify hotspots in your circuit. Overheating parts can indicate overloading or malfunctioning components. Early detection of these hotspots can help prevent further damage and maintain circuit performance.
Don't forget to document your findings and actions taken during this advanced troubleshooting as well. This practice not only aids in current problem-solving but also enriches your knowledge base for handling similar issues in the future.
Safety Protocols: Ensuring a Safe Environment for Electrical Work
Safety is paramount when working with electrical circuits, and one of the most critical safety protocols in this field is the use of lockout/tagout procedures. These procedures involve shutting off the power source and securing the isolation device with a lock and tag. This step ensures someone can't accidentally energize the circuit during maintenance or repair, protecting you and those around you from potential electrical hazards.
You should always use Lockout/Tagout (LOTO), even for quick repairs. It only takes a second to alter your life for a lifetime. Don't take chances.
It's always safer to work on an unenergized circuit. However, there could be scenarios where you need to deal with a live circuit, such as measuring voltage. In these cases, adhering to additional safety measures is crucial.
Quick tip: treat every circuit as a live circuit until you verify it's de-energized. Switches and disconnecting devices do fail.
First, don personal protective equipment (PPE), including insulated gloves and protective eyewear. Use tools that are rated for the voltages you'll be working with and ensure they’re in good condition. For some situations, an arc-flash hood and suit are mandatory. Before powering the circuit, double-check your connections and stand aside when energizing the circuit to avoid arc flash. Yes, even when turning on a circuit breaker.
When handling live parts, maintain a safe distance and use only one hand to handle the testing probes, keeping the other hand either in your pocket or behind your back if possible. This practice reduces the risk of electricity through your heart in case of an accidental shock. And it’s one reason so many good meters come with hanging straps.
Stay aware of your surroundings. Ensure the area is dry and free from any conductive materials that might cause electrical shocks or fires.
By adhering to these safety protocols, you minimize risks while dealing with electrical circuits.
Diagnostic Tools and Equipment
For electrical work, understanding the function and application of various diagnostic tools and equipment is paramount. These tools facilitate the detection, analysis, and resolution of electrical problems, ensuring the smooth operation of electrical systems. From basic handheld devices to more complex digital apparatus, each tool plays a vital role in the troubleshooting process. Here's a list of some essential diagnostic tools and their brief descriptions:
Armed with these diagnostic tools and equipment, any electrical professional is well-equipped to tackle a wide range of electrical issues, ensuring the safe and efficient operation of electrical systems.
Advanced techniques, rigid safety protocols, and quality tools for the job. These are the hallmarks of a true professional electrician.
First, we'll look at some basic and more advance troubleshooting techniques and strategies.
Then we'll discuss the importance of safety protocols when working with live circuits—an area that demands our undivided attention.
From there, we'll delve into the essential diagnostic tools that are key to effective troubleshooting. These are the very foundations of our craft, and understanding them can make all the difference in our day-to-day work.
If you’re a seasoned professionals, you've got a wealth of knowledge and experience under your belt. But the field of electrical troubleshooting is vast, constantly developing, and there's always room for more learning.
The first step is to verify the power supply to the circuit. This initial check, while simple, is crucial as it can rule out power issues and save considerable time in the troubleshooting process.
Once you confirm the proper power is present, proceed with a thorough visual inspection of the circuit. Be on the lookout for any noticeable signs of wear or damage, such as frayed wires, corroded connections, or burned-out components. These visible signs often point directly to the problem area.
An important aspect of troubleshooting that's often overlooked is documenting your steps and findings. Keeping a record of the symptoms observed, the steps taken to troubleshoot, and the results can be invaluable. This documentation can serve as a reference guide for future troubleshooting tasks on the same or similar circuits, saving time and ensuring consistency in your approach.
Moving onto advanced techniques, using diagnostic tools like a multimeter becomes vital. A multimeter allows you to measure key parameters like voltage, current, and resistance within the circuit, offering insights into its functioning and helping identify any irregularities that may exist.
Another advanced technique involves the use of thermal imaging to identify hotspots in your circuit. Overheating parts can indicate overloading or malfunctioning components. Early detection of these hotspots can help prevent further damage and maintain circuit performance.
Don't forget to document your findings and actions taken during this advanced troubleshooting as well. This practice not only aids in current problem-solving but also enriches your knowledge base for handling similar issues in the future.
Now let's talk about safety protocols when dealing with both de-energized and live circuits.
Safety is paramount when working with electrical circuits, and one of the most critical safety protocols in this field is the use of lockout/tagout procedures. These procedures involve shutting off the power source and securing the isolation device with a lock and tag. This step ensures someone can't accidentally energize the circuit during maintenance or repair, protecting you and those around you from potential electrical hazards.
You should always use Lockout/Tagout (LOTO), even for quick repairs. It only takes a second to alter your life for a lifetime. Don't take chances.
It's always safer to work on an unenergized circuit. However, there could be scenarios where you need to deal with a live circuit, such as measuring voltage. In these cases, adhering to additional safety measures is crucial.
Quick tip: treat every circuit as a live circuit until you verify it's de-energized. Switches and disconnecting devices do fail.
First, don personal protective equipment (PPE), including insulated gloves and protective eyewear. Use tools that are rated for the voltages you'll be working with and ensure they’re in good condition. For some situations, an arc-flash hood and suit are mandatory. Before powering the circuit, double-check your connections and stand aside when energizing the circuit to avoid arc flash. Yes, even when turning on a circuit breaker.
When handling live parts, maintain a safe distance and use only one hand to handle the testing probes, keeping the other hand either in your pocket or behind your back if possible. This practice reduces the risk of electricity through your heart in case of an accidental shock. And it’s one reason so many good meters come with hanging straps.
Stay aware of your surroundings. Ensure the area is dry and free from any conductive materials that might cause electrical shocks or fires.
By adhering to these safety protocols, you minimize risks while dealing with electrical circuits.
Now that we have highlighted the importance of safety, let's transition to the next topic—diagnostic tools and equipment.
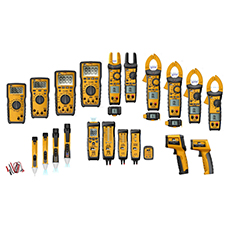
For electrical work, understanding the function and application of various diagnostic tools and equipment is paramount. These tools facilitate the detection, analysis, and resolution of electrical problems, ensuring the smooth operation of electrical systems. From basic handheld devices to more complex digital apparatus, each tool plays a vital role in the troubleshooting process. Here's a list of some essential diagnostic tools and their brief descriptions:
- Multimeter: A versatile device that measures voltage, current, and resistance, making it a crucial tool for diagnosing an array of electrical issues.
- Non-Contact Voltage Tester: Used to determine whether a circuit is live and to measure voltage levels, ensuring safety before working on any circuit.
- Oscilloscope: A sophisticated tool that visualizes the change of an electrical signal over time, aiding in waveform analysis and diagnosing complex electrical problems.
- Clamp Meter: Measures the current on a wire, offering a quick and safe measurement without the need to disconnect circuits.
- Continuity Tester: Checks if there is an electrical path between two points. Handy for testing fuses, wiring, and switches.
- Insulation Tester: Measures the resistance of the insulation. It's used to ensure the insulation material will effectively contain the current within the conductors.
- Earth Ground Tester: Used to verify that the grounding system in an electrical installation is effectively connected to earth.
- Phase Rotation Meter: Determines the sequence of phases in a three-phase system. Essential for installing equipment correctly and avoiding damage.
- Power Quality Analyzer: Measures the power consumption and quality of electrical systems. It helps identify issues like voltage drops, power factor issues, and harmonic distortion that may affect the performance of the equipment.
Armed with these diagnostic tools and equipment, any electrical professional is well-equipped to tackle a wide range of electrical issues, ensuring the safe and efficient operation of electrical systems.
Advanced techniques, rigid safety protocols, and quality tools for the job. These are the hallmarks of a true professional electrician.
Photo courtesy of IDEAL Industries